In December I briefly described a quick method for vectorizing pixels with the Live Trace feature in Adobe Illustrator.
In this tutorial you'll take almost the same steps in order to convert a Photoshop Brush object to an Illustrator brush file.
1) You'll need a brush set file and load it in adobe photoshop. In this case I'll use an Urban Scrawl Brush set for Photoshop available here.
 2) Load the brush (.arb) file in, by double click or dragging it into Photoshop.
3) Create a new document (white background, resolution - 200 ppi).
4) Select the brush tool, and chose a shape from the brush set that you just loaded. Change the opacity too 100% and select black for forground color. (use the screenshot below as reference)
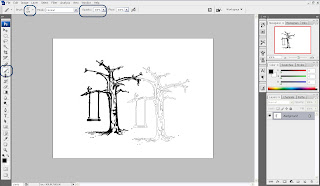
5)After selecting your shape click twice on the screen with the brush tool and save the document as jpeg or gif.
Now comes the second part - Bringing the image in Adobe Illustrator and Vectorizing it.
6)Load Illustrator and create a new print document. Then go to File>Place and choose the image that you created in photoshop.
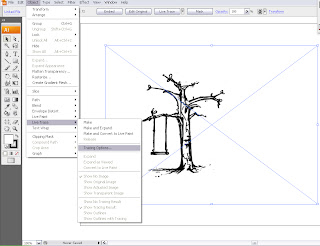
7) Select the image and go to Object>Live Trace>Tracing Options...
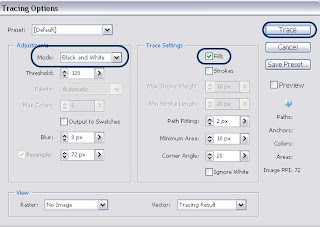
 8) In the Live Trace Dialogue Box make sure that you choose black & white mode and put a checkmark on Filles and click on Trace.
 9)Now you see the vectorized preview of the shape that you want to be your brush. But to use it as a regular vector object you have to expand it. Go to Object>Expand and then Object>Ungroup
11) The last step is to save your vector as a brush file. Open your brush palette (F5) select your vector object and drag it into the bursh pallette. A "new brush" window will popup, select "New Art Brush, click OK and then name it. In the palette you can se other brushes, that are loaded in Illustrator by default. Delete them from the palette (don't worry they are not going to be removed) by selecting them and clicking on the trash can. Leave only the brush that you've just created and go to Save Brushes... (look ath the image below) and name your file.
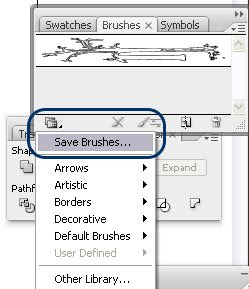 Well that's it. I Hope I didn't shorten the process a lot.


wow! u saved my life!! heheheh!! thx!
I have a problem with this part :delete the white areas. You can experiment with the stroke color or fill, it's up to you and the object...I tried everything I can, but no result. Can you explain me point to point.thanxxx
This is the best and most easiest tutorial. Thanks. Well you saved me too.
magnificent! this blog is loaded. we might need you around our group. keep in touch.
Ryhen
Is the Live Trace only an option in new CS versions? I only have CS but am thinking of upgrading. Can I skip CS2 and go straight to CS3?
Libby
Yes, the "Live Trace" feature is available in CS2 and above. I don't think you can upgrade directly to CS2, but you can always ask here: http://www.adobe.com/support/illustrator/
Great tutorial, help a lot,can explain the 200 ppi in adobe photoshop? how to set it? picel, cm,or mm?
Excellent and clear tutorial. Will save a lot of time!
Thank You!
Tutorial de jumento... ¬¬"
Bettus:
you can expand the traced object, use the white arrow tool and select a white area. Then go to select -> same fill color... and hit delete. all white areas should be gone. just make sure you don't have any other white areas you actually want on the canvas.
what about the opposite? if you make brushes in illustrator, how do you bring them into photoshop?
You can click "Ignore White" in the Live Trace dialog, so you don't have to delete it manually.
Thank you for the tip Cheryl !
Great tutorial!:) thanks
Fantastic Tutorial!!!
I was at the height of frustration with my project and about to give up - then I found this. Lifesaver!
Thank you!!!
amazing tutorial.. saved my life! thank you so much.. cheers :)
Post a Comment